27,499 views
 Free tool – Free POP3 Collector
Keywords : Free generic POP3 collector for Microsoft Exchange 2000 Exchange 2003 Exchange 2007 Lotus Domino Server download email from POP3 and forward to SMTP server
Over the last 12 years, I have created multiple email addresses hosted with various Internet Providers, or other companies. I’m still using some of those addresses, and my wife has a couple of email addresses as well, so the result is that I have (had) to configure multiple email accounts in Outlook (Express) to download emails from all of the email mailboxes. Those were the good old days.
Despite the fact that mailbox storage space has become less restrictive, some of the old email addresses still require me to download emails at least once a day, otherwise the ISP mailbox tends to fill up.
So I set up a mailserver and started looking for ways to periodically connect to my (POP3) ISP mailboxes, download the emails and deliver them to my local mailserver. After all, this technique speeds up the process of downloading emails (because the emails will be downloaded and forwarded to your local mailserver, so you only need to access your local mailserver) and also bypasses the need to manually download emails on a regular basis in order to avoid the mailbox to “overflow”.
There are a couple of tools available to collect emails from POP3 mailboxes and forward them to a user on a local smtp server, but they are either not free, lack features, limit the number of email accounts that can be created, are complex to set up, are product specific, have weak logging, do not support Secure POP3 (SSL) or Secure SMTP (SSL/TLS) with authentication, or corrupt attachments and so on. So I decided to write a more or less generic POP3 Collector tool myself, with focus on ease of use, stability and logging, and share the tool with everyone. The tool works with any mail platform that supports POP3 (to collect emails from) and SMTP (to send email to), including Lotus Domino, Exchange, and so on.
This is how it works (assuming that you’ve managed to install the tool using the setup wizard) :
When you first launch the tool, 2 config files will be created : appconfig.xml and userconfig.xml. Do NOT edit those files yourself, the application will interface between you and those configuration files. If you edit them yourself and if the application doesn’t like what you did to the files, then just remove the files and they will be recreated.
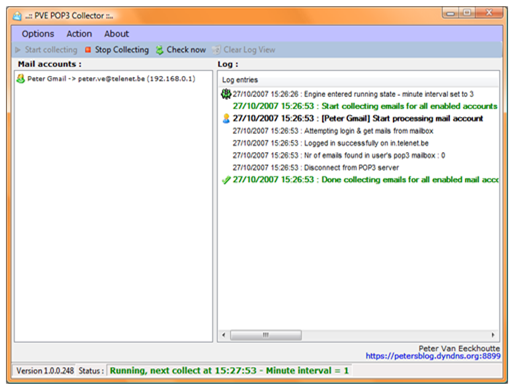
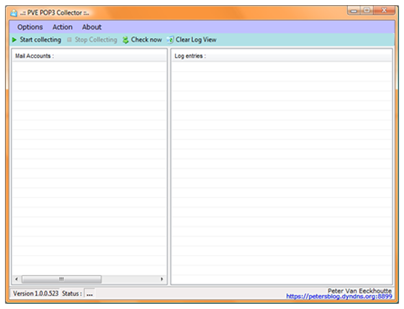
After launching the tool, you’ll get this :
Before starting to use the tool, let’s have a look at the preferences (Options – Preferences) :
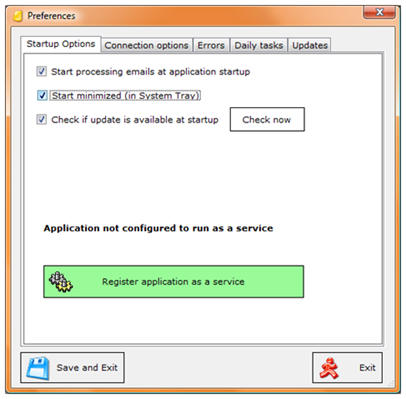
Startup options :
– Start processing emails at application startup : when enabled, the application will start collecting emails automatically after launching the application. It will do so using the time interval defined under “Connection options”. If you want to use the tool on continuous basis, I would recommend enabling this feature. Note : if you set the application to run as a service, make sure to add accounts and to enable this feature, so the application will start working as soon as you start the service.
– Start minimized (in System Tray) : when enabled, the application will go to the system tray at startup. You’ll have to double click the icon, or right click the icon and choose ‘Restore’ to view the application
– Check if update is available at startup : when enabled, the application will connect to http://users.telenet.be/internet.activities/freetools/pop3collector and download the version.txt file. If a new version is available on the download page, you’ll be prompted to download the new version or continue working with the existing version. As I’m still actively developing the tool, every update might offer additional features or stability, so updating would be highly recommended at this point in time.
– Register application as a service : if srvany.exe and instsrv.exe are present in the working directory (available via the installer, not via the update package), then you’ll see this button and you’ll be able to register the application as a service. For more information, see at the end of this post.
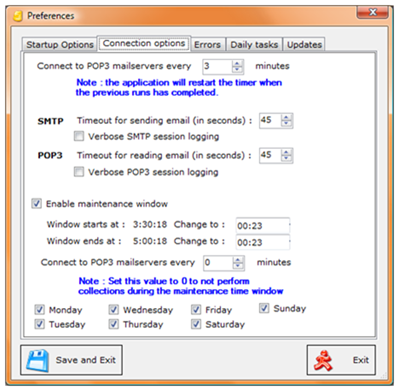
Connection options :
– Connect to mailserver every xxxx minutes : this allows you to set the time interval that is used to connect to your POP3 mailboxes and retrieve the emails. Depending on the number of mail accounts, this process may take a while. It is important to understand that the timer will only be reset after all mail accounts have been processed. So if checking all of your mail accounts takes 5 minutes and the time interval is set to 10 minutes, then each run will be triggered every 15 minutes. ISP’s don’t like clients to connect too fast, so be gentle with this value. I would recommend anything between 5 and 30 minutes – whatever suits you best.
– SMTP : Timeout for sending mails (in seconds) : This setting applies to the number of seconds before an outbound smtp connection times out. 30 to 45 seconds would be an OK value.
– SMTP : Verbose SMTP session logging : This allows you to log all SMTP sessions to the log files. This feature might help you troubleshooting why outbound emails are not sent.
– POP3 : Timeout for reading mail (in seconds) : This setting applies to the number of seconds before a POP3 connection times out. 30 to 45 seconds would be fine.
– POP3 : Verbose POP3 session logging : This setting allows you to log all POP3 session details to the log files. This feature might help you troubleshooting the cause of POP3 failures.
Enable maintenance window : When enabled, the application will use a different connection interval, as specified under this section. If the interval is set to 0, there will be no connects at all during the maintenance window.
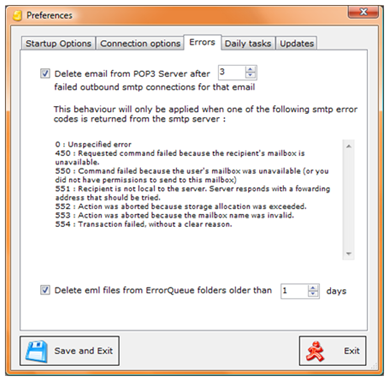
Errors
– Delete email from POP3 Server after x failed outbound smtp connections for that email : when an email is downloaded from a POP3 mailbox, but the forward action fails, then the email is left on the POP3 server. If the forward action fails because the smtp server returns one of the codes in the list, then you can have that email automatically removed from the POP3 server without forwarding it, and save one copy of the email in the errorqueue folder. This will avoid repeated POP3 downloads (and duplicate emails) when you are experiencing problems with sending certain emails.
– Delete eml files from ErrorQueue folders older than x days : this setting allows you to clean up the ErrorQueue folders automatically. I strongly suggest using this feature in combination with the end user daily report (so the user knows which email was put in the ErrorQueue and which email has been deleted from the ErrorQueue. Set this value to 5 or so to allow end users to request an email release.
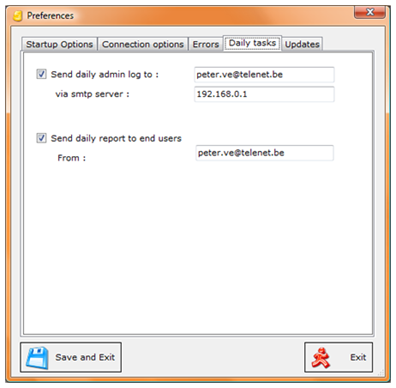
Daily Task options :
When you want to receive a daily email with the log file of the previous day attached to it, enable this feature and fill out the 2 fields :
– Send daily reports to : fill out the email address of your postmaster. You can specify multiple addresses by separating the email addresses using a semicolon (;)
– via smtp server : fill out the smtp server used to send the daily report.
The daily report is sent
– when the tool is running in “Auto Collection” mode
– when the tool started running yesterday and is still running at midnight. The report will be sent the first time the collection runs the next day, after midnight.
– Send daily report to end users : when enabled, active users, that have a valid “foward to” email address defined, will get a daily overview when a message has been put in the ErrorQueue folder in the last 24 hours, and will get an email when eml files have been removed from the ErrorQueue folder. Fill out a valid email address for the “From:” email address here. The tool will use the smtp settings (including encryption, authentication, etc) from the user account profile.
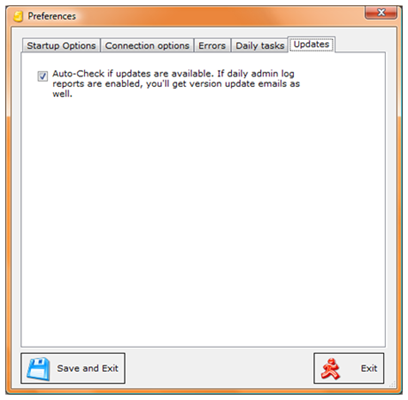
Updates
– Auto-check : if daily admin log file is enabled, the tool will check for updates as well and send an email to the admin, notifying him/her that a new version of the tool is available for download
Click “Save and Exit”
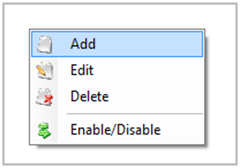
Now, it is time to add mail accounts. In the main screen, right click in the left pane and select “Add”
You’ll get a blank mail account page :
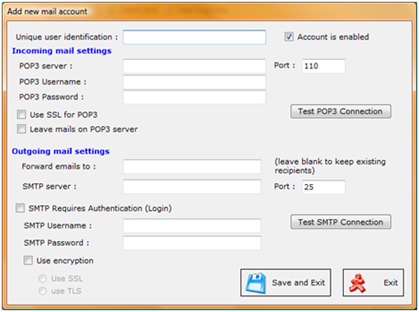
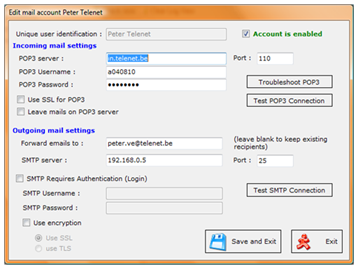
Fill out a unique user identification. Keep in mind that some special characters might be removed, so keep this name short and simple.
Make sure the account is “enabled” if you want to use this account.
Fill out the Incoming mail settings. In most cases, POP3 mailboxes accept incoming connections on tcp port 110, but make sure to check with your ISP.
Fill out the POP3 servername or IP address, the POP3 username and the POP3 password. If the POP3 connection allows/requires SSL, then enable “Use SSL for POP3”. (Example : Gmail allows POP enabled mail. You need to enable POP on your Gmail settings page, then set the POP port to 995, fill out your gmail email address as username and Enable “Use SSL for POP3”. Click the “Test POP3 connection” button to verify that the parameters are set up correctly.)
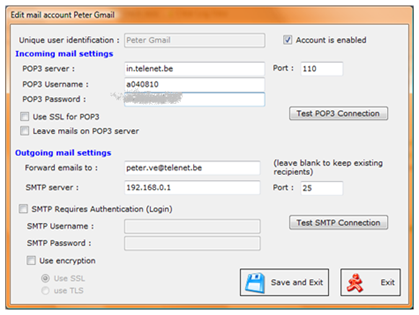
The Leave mails on POP3 server option allows you to download emails from the server without deleting them. Since POP3 does not allow read/unread marks on the server, a .pop3 file will be automatically created in the POP3Status folder, containing the ID of the last email that was downloaded. This will ensure that the application will only download new emails (emails with an ID after the ID saved in the pop3 status file). If, for whatever reason, you want to reset this temp ID to the ID of the last email on the server, then you need to edit the Mail Account, and click the “Reset Mail ID” button. If the application lost track of the last ID (so when no emails are downloaded), use the “Remove mail ID” button to remove the ID. At the next run, emails will be downloaded and the last ID will be recreated.
You can also use the “Troubleshoot POP3” button to have a look at the contents of the POP3 mailbox on the server. If “Leave mails on POP3 server” was enabled for that mail account, you will be able to select an individual email from the queue and set the “Last ID” to that email.
Next, enter the Outgoing mail settings. Fill out a specific email address if you want to forward the email to a specific email address. You can specify multiple email addresses by separating the email addresses using a semicolon (;)
If you leave this field blank, then the application will first try to find a “Delivered-To” Header field and use the contents of that field to deliver emails to.
Set the IP address of hostname of the SMTP server and fill out the smtp port. In most cases, port 25 will be ok. However, if you are using Exchange 2007, you’ll have to use a different port, enable authentication, and enable TLS.
Note : if you don’t want to use the contents of “Delivered-To” but rather want to use the contents of the “To:” field, then you’ll have to create a conditional forwarding rule (see later)
Click “Save and Exit” and you’ll be redirected to the main screen. The newly created account will now be visible in the left pane.
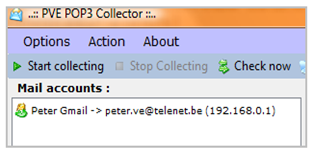
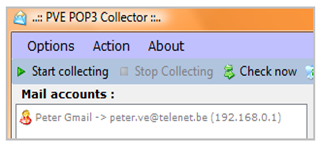
Right click the account to either edit, delete, or change the enable state. If an account is disabled, its icon will be red and the account name will be set in gray.
Conditional forwarding
Starting from v1.1.0.3, you have the option to create rules and change the email flow/email addresses/send a copy of the mail to someone else/… based upon certain criteria. If you edit an already existing mail account, you’ll see a “Conditional forwarding” button.
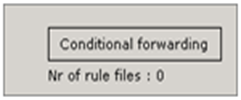
If you click this button, you’ll be able to create/manage new rules. These rules will be applied to all incoming emails for that mail account. When a rule matches, the other rules will not be processed anymore.
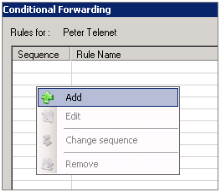
Right-click and choose ‘Add’ to create a new rule
Fill out a unique rule name, select at least one criterium, and set the forwarding action(s). Click “Save and Close” to save the new rule.
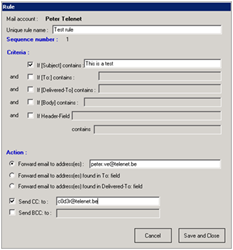
(note : this screenshot is somewhat outdated – the current version offers more features than what is displayed above)
When an email is downloaded for the selected mail account, and if a rule matches, this is what you’ll see in the log file :
You can enable “continue processing” if you want to merge the settings of multiple rules. Note that, in case of duplicate actions, the last rule will win.
If you have added your mail accounts (and enabled the ones that you want to use), you can click “Start collecting” to start the timer, or run “Check now” to manually perform a collection run.

If SSL or TLS is used for a specific connection, you’ll see a “lock” icon next to the corresponding log entry.
That’s it – those are the basic functionalities of the application.
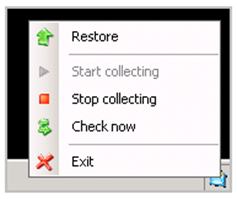
if you click the “minimize” button, the application will be put in the System Tray. You can right-click the System Tray icon to perform some basic tasks :
Other information
Can I run the pop3 collector as a Windows service ?
Yes you can.
Manually create POP3Collector service :
You will need the srvany.exe and instsrv.exe executables from the Windows resource kit. (download for free from http://www.microsoft.com/downloads/details.aspx?FamilyID=9d467a69-57ff-4ae7-96ee-b18c4790cffd&displaylang=en )
Assuming that the POP3 Collector tool is installed under “C:\Program Files\Peter Van Eeckhoutte\PVE POP3 Collector” :
1. Copy srvany.exe to “C:\Program Files\Peter Van Eeckhoutte\PVE POP3 Collector”
2. Create service :
instsrv.exe “PVEPOP3Collector” “C:\Program Files\Peter Van Eeckhoutte\PVE POP3 Collector\srvany.exe”
3. Open regedit and go to HKLM\System\CurrentControlSet\Services\PVEPOP3Collector
Create a new key called “Parameters”
Under the new key, create a new REG_SZ (String) value called “Application” and set its value to C:\Program Files\Peter Van Eeckhoutte\PVE POP3 Collector\PVEPOP3Collector.exe
Add another String value called “AppDirectory” and set its value to C:\Program Files\Peter Van Eeckhoutte\PVE POP3 Collector
Open services mmc, go to the service and make sure to DISABLE “allow service to interact with the desktop”. Don’t start the service yet. First, start the application and open ‘preferences’ to enable Minimized startup, automatically start collecting at startup and Hide GUI. Save settings, close the application, and then start the service.
Automatically create POP3Collector service (only available from version 1.0.0.453 and above) :
Make sure srvany.exe and instsrv.exe are in the application directory. From version 1.0.0.453, these 2 files are part of the installation package. Go to preferences, and you should see a button that will allow you to register or unregister the application as a service.
Make sure to enable the following settings as well (under preferences) :
– Mimimized startup
– Automatically start collecting at startup
– Hide GUI
Close the application and edit newly created service. The service should be set to start automatically. Make sure “interact with the desktop” is disabled. Start the service and open the log file in order to verify that the service has started without problems. You can now use the shortcut on the desktop to make config changes. Before you can make config changes, you will be prompted to stop the service. After making changes, close the application and then start the service again (not vice versa !). This will, everything will run as expected.
Logging
Next to the log view in the main screen of the application (which will be cleared once a day), a daily log file is created in the “Log” folder. These daily files will be overwritten automatically after one week, so you don’t need to clean them up yourself.
What happens when POP3 and/or SMTP communication goes wrong ?
I tried to do the best I could to preserve emails. So if a POP3 download doesn’t work, emails are left on the server. If a POP3 download works, but the smtp forward fails, then the email is left on the server, and a .eml copy of the mail is save in the ErrorQueue folder. If that email is sent after all (during one of the next collection runs), then the eml file will be deleted automatically. You can use the option to remove failed emails from a POP3 server (when a smtp forward fails) after x amount of attempts. This will ensure your ErrorQueue doesn’t fill up, this will avoid duplicate emails and recurring POP3 downloads. A single copy of the email will be stored in the ErrorQueue folder. You can enable daily user reports, so the end users will know when an email was saved in the ErrorQueue folder.
You can manage those .eml files using “Action” – “Manage Error Queue”.
You can view the eml file, save/remove attachments, manually re-send the email to a specific email address via a specific smtp server, delete .eml files… Just have a look yourself – the feature set is basic, and everything is more or less self-explanatory. At least, it will make sure you don’t lose any mails.
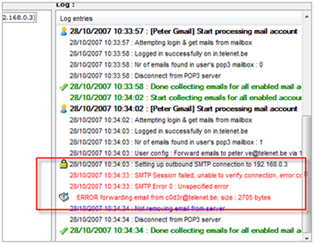
Example : an email was detected in a mailbox, but the forward action failed :
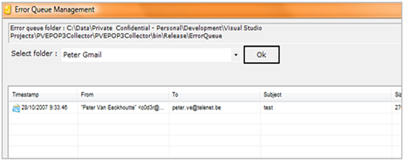
Go to the Manage Error Queue tool, select the mailbox (Peter Gmail in my example) and click “OK”. This will pull up the .eml files in the ErrorQueue folder that are associated with that mail account :
If you double-click the email, you can see the header, number of attachments, and the attachment file names/sizes.
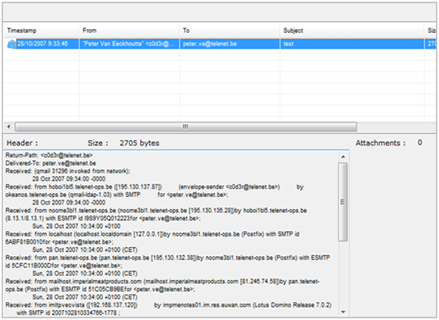
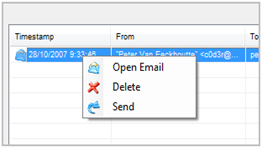
If you right-click the email, you can open the email (using the application that is associated with .eml files), delete the email, or manually forward the email (send)
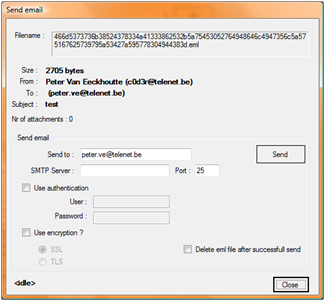
When choosing send, you can modify the recipient address and/or use a different smtp server. You can also enable the checkbox to delete the file when the email is successfully sent.
If the errorqueue shows an email that contains one or more attachments, then you can see the list of attachments on the right hand side of the window :
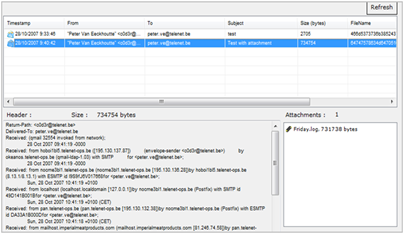
Right-click the attachment to perform one of the following actions to the selected attachment :
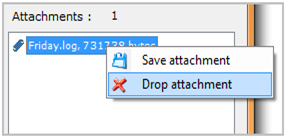
“Save attachment” will save the attachment to disk. Drop attachment will remove the attachment from the eml file.
Can I see the POP3 queue on the remote server and remove emails without downloading them ?
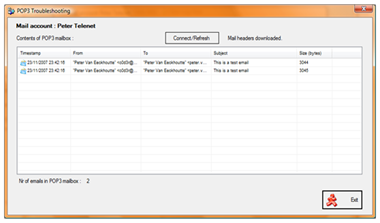
Yes you can ! Edit the user account and click the “Troubleshoot POP3” button. (This button is only visible for existing accounts, the button is not visible when you are creating a new account)
Click “Connect/Refresh” to get a list of all emails that are available for download on the POP3 server.
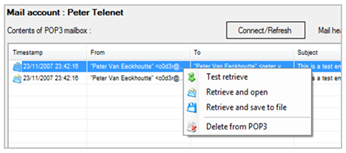
Select a message and right-click :
You can simulate the download via “Test retrieve”, “Retrieve and open the email”, “Retrieve and save to file”, or “Delete from the POP3 server” (which also works if you select multiple emails)
Click here to go to the download page
(or copy the URL https://www.corelan.be/index.php/my-free-tools/pve-pop3-collector/ into your browser)
The application is what it is, but it is free and works fine for me. If you like my tools and if you like me to continue building free tools, then feel free to donate (just a couple of dollars or euros will be fine) – contact me for paypal information. And you don’t feel like donating, that’s fine too – I’m not doing this for profit, only for fun J
Anyways : bugs, comments, feature requests : Use the discussion forum at https://www.corelan.be/index.php/forum/pve-pop3-collector-1
If you have specific questions, make sure to include your email address so I can respond to you directly. (or just send me an email at peter [dot] ve [at] telenet [dot] be
In case you need to send me a log file, please read this first : https://www.corelan.be/index.php/forum/before-reporting-a-pve-pop3-collector-bug-1
© 2007 – 2021, Peter Van Eeckhoutte (corelanc0d3r). All rights reserved.
