13,710 views
 Merging & Syncing multiple Active Directory databases into one ADAM instance
Keywords : ldap authentication multiple domains combine adam adamsync adschemaanalyzer ldap proxy chain ldifde MS-ADAMSyncconf.xml MS-AdamSyncMetadata.ldf MS-ADAMSchemaW2K3.ldf Object Violation Naming Violation Ldap error occured. ldap_add_sW: Object Class Violation.
Case definition :
- 2 AD domains, containing user accounts. One of the domains is a 2003 based domain and has the R2 + Exchange 2003 + Exchange 2007 schema extensions, the other one is a 2008 based domain, without any schema extensions.. Both domains have user accounts.
- 1 third party system that uses LDAP to query for object information. The system can not perform ldap chaining, it can only connect to one ldap instance.
- Question : how can we allow this third party system to use ldap to query information from user accounts in both domains at the same time ?
Solution :
use ADAM to build a new LDAP enabled user directory, and set up synchronization from the two account domains to the ADAM instance (so the "combined" ADAM directory stays up to date).
Requirements :
I have installed ADAM on a Windows 2003 R2 server standard edition. If you are not running R2, you need to download ADAM SP1 from the Microsoft website. If you are running R2, you can install ADAM using the Add/Remove Windows Components wizard (Active Directory Services – ADAM).
By default, ADAM is installed under C:\Windows\ADAM
This server does not need to be a member of one of the account domains, but if you want to look at authenticating users later on, I would make it a member of one of the account domains. I would advise not to run ADAM on a Domain Controller. (It is possible, but you’ll have to pick different LDAP ports to run ADAM on, which may make things more complex. After all, the "system" that uses LDAP authentication may not be able to specify another port other than the default 389 (LDAP) or 636 (LDAP over SSL)
(Note : if you want to use LDAP over SSL, the server running ADAM needs to have a valid certificate)
If you want to authenticate users also, you need to have a trust between the domain where the ADAM instance is hosted, and the other domain(s) that host the user accounts. This trust can be a one-way trust if required (outgoing trust from the domain that hosts the ADAM instance to the domain(s) that host the user accounts. This way, the ADAM instance will be able to forward the authentication requests to DC’s in those account domains). If you are looking to synchronize password information as well (out of scope for this procedure), you will need IIFP & PCNS, which may require forest trusts to be set up.
Futhermore, You’ll need to have a user account from both account domains that has access to all attributes of all user accounts in the domain. This account will be used by ADAMSync to synchronize the Account Domain users to ADAM.
Last but not least, the machine running ADAM must be able to find all domains (DNS), find domain controllers in both domains (using DNS) and connect to these DC’s.
Create a new ADAM Instance :
After installing ADAM, you need to create a new ADAM instance.
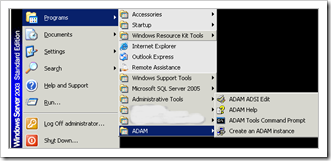
You can do this using command-line or using the wizard. Open the Start Menu and navigate to the ADAM folder. Click "Create an ADAM instance" to launch the wizard
Click "Next" at the Welcome page
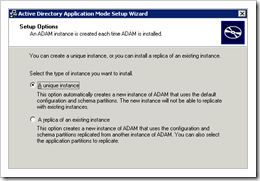
Select "A unique instance" and click "Next"
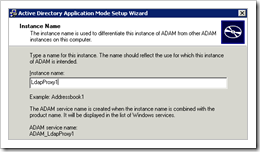
Provide a name for this instance. This can be anything. I have picked "LdapProxy1" . Click "Next" to continue
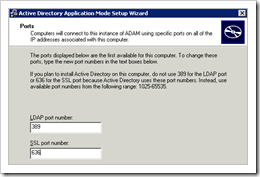
Set the LDAP ports and click "Next"
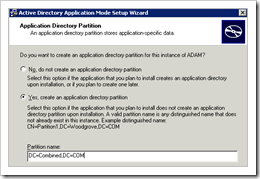
Select "Yes, create an application directory partition" and enter the partition name. Despite the fact that the text indicates to pick a distinguished name that uses "CN", I would recommend not to do this. Just pick a Partition Name that is based on "DC" attributes. Otherwise, you may end up with "Object Name Violation" errors later on.
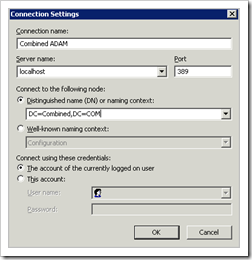
In my example, I have used "DC=Combined,DC=COM"
Click "Next" to continue
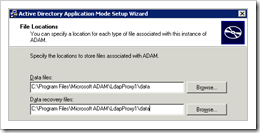
Set the folders where you want to store the data related to this ADAM instance and click "Next"
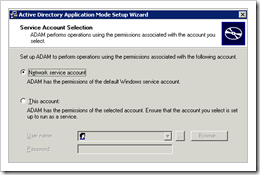
Set the instance to either run as Network service or use a user account that has permissions to run as a service. The latter is recommended because this allows you to run the ADAM instance with a low privileged user account. Click "Next" to continue
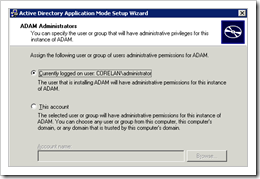
Select who needs to be granted administrator privileges on the ADAM instance. Click "Next" to continue.
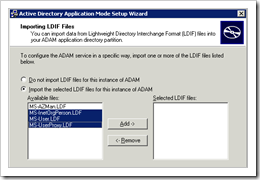
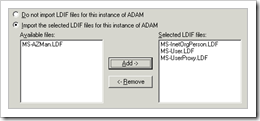
Import at least the MS-User.LDP file. Click "Next" to continue
Click "Next" to finalize the setup of the ADAM Instance. When the installation has complete, verify that the instance is running
You can use netstat -na to verify that ports 389 and 636 are listening.
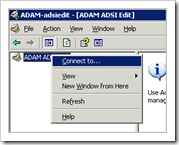
Finally, use the "ADAM ADSI Edit" utility (from the ADAM Program Folder) to connect to the instance & validate that it is operational :
Set up / extend the ADAM Schema :
Before you can start synchronizing AD to ADAM, you need to make sure the ADAM schema contains the same extensions as the AD Schema of the source domain(s). So for each of the source domains, you need to follow these steps (unless all of the source domains have the same schema version. In that case, you only need to do this just once).
By default, the ADAM schema does not contain a lot of attributes/classes/…
There are 2 ways to extend the ADAM Schema. You can start with applying a default Windows 2003 schema and then find any differences between the 2003 schema and the schema on the account domain, and apply those differences, or you you can extend the ADAM schema by grabbing the default (limited) ADAM schema, grabbing the schema from the source account domain, listing the difference between the two, and then apply the entire set of differences to ADAM.
Most documentation about ADAM tells you to first apply the Windows 2003 schema by running
ldifde -i -s localhost -c "CN=Configuration,DC=X" #ConfigurationNamingContext _
-f MS-ADAMSchemaW2K3.ldf
If you have Exchange 2003 extension, I would NOT recommend doing this. Because of the Exchange schema change, you may get errors when trying to sync AD to ADAM.
Ldap error occured. ldap_add_sW: Object Class Violation.
Extended Info: 0000207D: UpdErr: DSID-0315119D, problem 6002 (OBJ_CLASS_VIOLATION), data -1760298156.
So if you are running a default 2003/2003 R2 schema, this may be fine. But if you have extended the schema in your account domain with other attributes, I would not use the MS-ADAMSchemaW2K3.ldf file, but I would rather create a full list of schema differences and apply the entire set of differences to ADAM right away.
This is how it works :
Account Domain 1 : corelan.be, Windows 2003 R2 schema, with Exchange 2003 and 2007 schema extensions
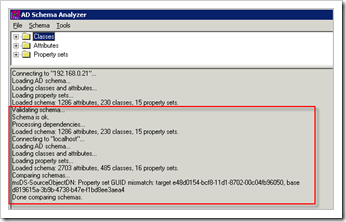
On the server running ADAM, open a command prompt in the C:\Windows\Adam folder ("ADAM Tools Command Prompt" in the ADAM Start Meny Program Folder), and run "ADSchemaAnalyzer"
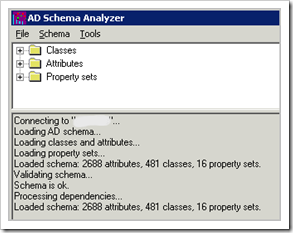
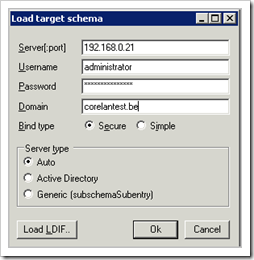
The target schema = the schema of the Account Domain. So enter the name of a DC from the Account domain, and specify the requried Domain Admin credentials in order to properly connect to the domain. Press "OK" and wait until the classes and attributes have been loaded
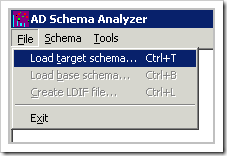
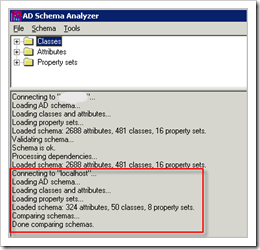
Next, Open "File" – "Load base schema" and enter the hostname of the machine running the ADAM instance (localhost). Press "OK" to grab the current ADAM schema.
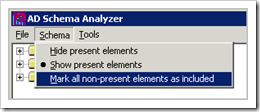
Now you need to mark all differences for export. Click "Schema" and select "Mark all non-present elements as included"local
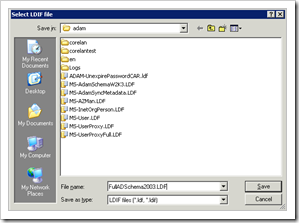
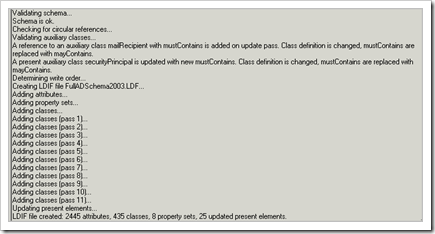
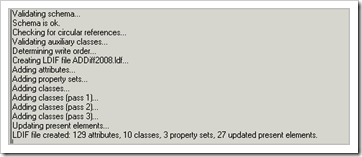
Now you can save the differences between the two schema’s via "File – Create LDIF File". Save the file (example : FullADSchema2003.LDF) and close the application
Now you can apply these schema differences to the ADAM instance, using the following command (depending on the number of objects, this may take a while) :
ldifde.exe -i -s localhost -c "CN=Configuration,DC=X" #ConfigurationNamingContext _
-f FullADSchema2003.ldf
Connecting to "localhost"
Logging in as current user using SSPI
Importing directory from file "FullADSchema2003.ldf"
Loading entries.................................................................
................................................................................
................................................................................
................................................................................
................................................................................
................................................................................
................................................................................
................................................................................
................................................................................
................................................................................
................................................................................
................................................................................
................................................................................
................................................................................
................................................................................
................................................................................
................................................................................
................................................................................
................................................................................
................................................................................
................................................................................
................................................................................
................................................................................
................................................................................
................................................................................
................................................................................
................................................................................
................................................................................
................................................................................
................................................................................
................................................................................
................................................................................
................................................................................
................................................................................
................................................................................
..............................................................................2862 entries modified successfully.
The command has completed successfully
(Note : if you want to replace CN=Configuration,DC=X by something else, make sure to update all LDF and XML files from this point forward, and to replace DC=X by whatever value you want to use, however it does not really matter what value you use here as it will not be used when you just want to use ADAM for LDAP authentication). If you get errors such as
Add error on line 10231: Referral
The server side error is: 0x202b A referral was returned from the server.
The extended server error is:
0000202B: RefErr: DSID-0310073F, data 0, 1 access points
        ref 1: 'x'
then verify the ldf file and make sure there are no errors/mistakes around that line (which should not happen if you do not change/replace the DC=X by something else)
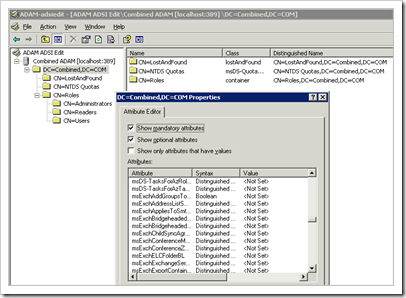
You can verify that the ldifde has worked by opening ADAM-adsiedit, connecting to the ADAM instance and looking at the properties of the DC=Combined,DC=COM instance and verifying that the new attributes are visible
Now you need to do the same actions for the second account domain, assuming that it is running a different schema version than the one from the first account domain (which has now been applied to the ADAM instance)
Account Domain 2 : corelantest.be, Windows 2008 schema. Domain is running Windows Server 2008 Forest functional level.
Run the ADSchemaAnalyzer.exe again, load the Target Schema from the DC from the corelantest.be domain
Again, when connecting to the remote DC, don’t forget to specify credentials if required.
Next load the base schema from the local ADAM instance (which has now already been updated with the R2, Exchange 2003 and 2007 extensions, because those extensions were loaded in the corelan.be domain).
Next, click "Mark all non-present elements as included" from the "Schema" menu, and finally, save the differences in a unique LDF file (e.g. ADDiff2008.LDF)
Now apply the differences to your ADAM instance. Since the local ADAM instance already has a considerable amount of attributes & classes, this should not take very long :
ldifde.exe -i -s localhost -c "CN=Configuration,DC=X" #ConfigurationNamingContext -f ADDiff2008.ldf
Connecting to "localhost"
Logging in as current user using SSPI
Importing directory from file "ADDiff2008.ldf"
Loading entries.................................................................
................................................................................
........................
168 entries modified successfully.

The command has completed successfully
Import ADAMSync Metadata :
Before you can start synchronizing, you need to import ADAMSync metadata to the ADAM Instance. You can do this using the following command :
ldifde.exe -i -s localhost -c "CN=Configuration,DC=X" #ConfigurationNamingContext _
-f MS-AdamSyncMetadata.LDF
Connecting to "localhost" Logging in as current user using SSPI Importing directory from file "MS-AdamSyncMetadata.LDF" Loading entries.......... 9 entries modified successfully. The command has completed successfully
Set up ADAMSync for corelan.be
For each of the account domains that you want to sync, you will have to create a unique configuration file. There is a sample config file called MS-ADAMSyncConf.xml available, so I would recommend creating a folder for each of the account domains, copying the example file and renaming it so it reflects the account domain it corresponds to
Since I have 2 account domains, my folder layout looks like this
C:\Windows\ADAM\Sync\corelan
C:\Windows\ADAM\Sync\corelantest
Additionally, I have created a folder call "Logs" to store the sync log files later on.
C:\WINDOWS\ADAM>dir *.
 Volume in drive C has no label.
 Volume Serial Number is D8C4-667C

 Directory of C:\WINDOWS\ADAM

02/08/2008  23:05    <DIR>          .
02/08/2008  23:05    <DIR>          ..
02/08/2008  22:25    <DIR>          corelan
02/08/2008  22:25    <DIR>          corelantest
02/08/2008  22:28    <DIR>          en
02/08/2008  18:00    <DIR>          Logs
Before we can start syncing, we need to configure the configuration xml file for each (source) account domain – ADAM combination.
Let’s start with the configuration file for the corelan (2003 based) account domain. I have named this file MS-ADAMSyncConfCorelan.xml
C:\WINDOWS\adam\corelan>dir
 Volume in drive C has no label.
 Volume Serial Number is D8C4-667C

 Directory of C:\WINDOWS\adam\corelan

02/08/2008  23:09    <DIR>          .
02/08/2008  23:09    <DIR>          ..
02/08/2008  17:58             2.826 MS-AdamSyncConfCorelan.XML
Edit the file using notepad and change the following tags :
Next, you need to specify which type of objects, and what attributes you want to replicate. You can select the type of object by editing the
By default, all attribtutes are being synchronised, but if you are only looking for providing ldap authentication to a third party system, you may not need to go through the trouble of getting exchange specific attributes synced. So I would advise to extend the default list of attributes that do not need to be synced by adding the following list to the
<exclude>msRTCSIP-PrimaryUserAddressexclude>
<exclude>msRTCSIP-UserEnabledexclude>
<exclude>msRTCSIP-PrimaryHomeServerexclude>
<exclude>msRTCSIP-ArchivingEnabledexclude>
<exclude>msRTCSIP-OptionFlagsexclude>
<exclude>msRTCSIP-UserPolicyexclude>
<exclude>msExchHomeServerNameexclude>
<exclude>msExchALObjectVersionexclude>
<exclude>msExchMailboxSecurityDescriptorexclude>
<exclude>msExchUserAccountControlexclude>
<exclude>msExchMailboxGuidexclude>
<exclude>msExchPoliciesExcludedexclude>
<exclude>msExchMailboxTemplateLinkexclude>
<exclude>msExchRecipientDisplayTypeexclude>
<exclude>msExchUserCultureexclude>
<exclude>msExchVersionexclude>
<exclude>msExchRecipientTypeDetailsexclude>
<exclude>msExchOmaAdminWirelessEnableexclude>
<exclude>lastagedchangeexclude>
Save the file. The entire file looks like this :
xml version="1.0"?>
<doc>
 <configuration>
  <description>sample Adamsync configuration filedescription>
  <security-mode>objectsecurity-mode>
  <source-ad-name>corelan.besource-ad-name>
  <source-ad-partition>dc=corelan,dc=besource-ad-partition>
  <source-ad-account>ADAMDomainAdminsource-ad-account>
  <account-domain>corelan.beaccount-domain>
  <target-dn>dc=combined,dc=comtarget-dn>
  <query>
   <base-dn>dc=corelan,dc=bebase-dn>
   <object-filter>(objectCategory=person)object-filter>
   <attributes>
    <include>include>
    <exclude>extensionNameexclude>
    <exclude>displayNamePrintableexclude>
    <exclude>flagsexclude>
    <exclude>isPrivelegeHolderexclude>
    <exclude>msCom-UserLinkexclude>
    <exclude>msCom-PartitionSetLinkexclude>
    <exclude>reportsexclude>
    <exclude>serviceprincipalnameexclude>
    <exclude>adminCountexclude>
    <exclude>primarygroupidexclude>
    <exclude>codePageexclude>
    <exclude>countryCodeexclude>
    <exclude>msRTCSIP-PrimaryUserAddressexclude>
    <exclude>msRTCSIP-UserEnabledexclude>
    <exclude>msRTCSIP-PrimaryHomeServerexclude>
    <exclude>msRTCSIP-ArchivingEnabledexclude>
    <exclude>msRTCSIP-OptionFlagsexclude>
    <exclude>msRTCSIP-UserPolicyexclude>
    <exclude>msExchHomeServerNameexclude>
    <exclude>msExchALObjectVersionexclude>
    <exclude>msExchMailboxSecurityDescriptorexclude>
    <exclude>msExchUserAccountControlexclude>
    <exclude>msExchMailboxGuidexclude>
    <exclude>msExchPoliciesExcludedexclude>
    <exclude>msExchMailboxTemplateLinkexclude>
    <exclude>msExchRecipientDisplayTypeexclude>
    <exclude>msExchUserCultureexclude>
    <exclude>msExchVersionexclude>
    <exclude>msExchRecipientTypeDetailsexclude>
    <exclude>msExchOmaAdminWirelessEnableexclude>
    <exclude>lastagedchangeexclude>
   attributes>
  query>
  <schedule>
   <aging>
    <frequency>0frequency>
    <num-objects>0num-objects>
   aging>
   <schtasks-cmd>schtasks-cmd>
  schedule>
 configuration>
 <synchronizer-state>
  <dirsync-cookie>dirsync-cookie>
  <status>status>
  <authoritative-adam-instance>authoritative-adam-instance>
  <configuration-file-guid>configuration-file-guid>
  <last-sync-attempt-time>last-sync-attempt-time>
  <last-sync-success-time>last-sync-success-time>
  <last-sync-error-time>last-sync-error-time>
  <last-sync-error-string>last-sync-error-string>
  <consecutive-sync-failures>consecutive-sync-failures>
  <user-credentials>user-credentials>
  <runs-since-last-object-update>runs-since-last-object-update>
  <runs-since-last-full-sync>runs-since-last-full-sync>
 synchronizer-state>
doc>
Now you can install this configuration into ADAM, and sync the corelan.be account domain to the ADAM instance :
C:\WINDOWS\adam>adamsync.exe /install localhost C:\Windows\ADAM\corelan\MS-AdamSyncConfCorelan.XML _ /passprompt
Please enter password:
Done.
Enter the password of the user account that is specified in the .xml configuration file. Make sure to specify the password correctly, because even if you enter a wrong password, the process will still complete with the "Done." message and will not indicate that there is a problem.
Now sync the corelan.be AD domain to ADAM using the following command :
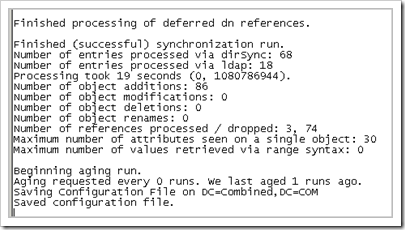
C:\WINDOWS\adam>adamsync /sync localhost "dc=combined,dc=com" /log c:\windows\adam\Logs\synclog.txt
Depending on the size of the source AD (account domain), this may take a while. When the process has complete, open the log file and verify that the process has completed successfully.
If you now use ADAM-adsiedit, you should see the AD structure (or at least the OU structure that contains user objects) and user accounts of the source AD domain in the ADAM instance.
Set up ADAMSync for corelantest.be
Create a unique xml configuration file for the corelantest.be domain and run the adamsync tool with /install and /sync parameters to sync this domain as well.
The top part of the xml file should look something like this :
xml version="1.0"?>
<doc>
  <configuration>
  <description>sample Adamsync configuration filedescription>
  <security-mode>objectsecurity-mode>
  <source-ad-name>corelantest.besource-ad-name>
  <source-ad-partition>dc=corelantest,dc=besource-ad-partition>
  <source-ad-account>CorelantestAdminAccountsource-ad-account>
  <account-domain>corelantest.beaccount-domain>
  <target-dn>dc=combined,dc=comtarget-dn>
  <query>
   <base-dn>dc=corelantest,dc=bebase-dn>
   <object-filter>(objectCategory=person)object-filter>
etc… (don’t forget to put in the attribute exclusions as shown in the config file from corelan.be)
Next, install the config file and then run the sync
C:\WINDOWS\adam>adamsync.exe /install localhost _ C:\Windows\ADAM\corelantest\MS-AdamSyncConfCorelantest.XML _ /passprompt
Please enter password:
Done.

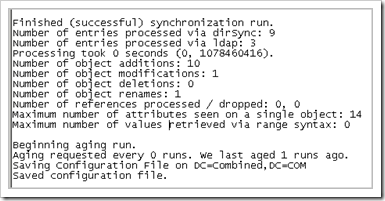
C:\WINDOWS\adam>adamsync /sync localhost "dc=combined,dc=com" _ /log c:\windows\adam\Logs\synclogCorelantest.txt
Review the log file & look for errors
That’s it
© 2008 – 2021, Peter Van Eeckhoutte (corelanc0d3r). All rights reserved.
Comments are closed.
Corelan Training
Check out our schedules page here and sign up for one of our classes now!
Donate

Your donation will help funding server hosting.
Corelan Team Merchandise
Corelan on Slack
You can chat with us and our friends on our Slack workspace:
